Sunday, March 30, 2014

Portobello & Basil Cheese Tortellini

This is so yummy.  And Ava ate ALL of her dinner tonight... BEFORE everyone else finished.  That is monumental.  I told her that I would make this every week if she would eat like that!

The original called for twice as much basil, but I liked it how we made it.  This is from Simple and Delicious.


Portobello & Basil Cheese Tortellini
 Portobello & Basil Cheese Tortellini
Ingredients
  • 1 package (19 ounces) frozen cheese tortellini
  • 1 pound sliced portobello mushrooms
  • 1 small onion, chopped
  • 1/3 cup butter, cubed
  • 2-4 garlic cloves, minced
  • 1 cup reduced-sodium chicken broth
  • 1 cup heavy whipping cream
  • 1/2 teaspoon salt
  • 1/2 teaspoon pepper
  • 1/3 cup grated Parmesan cheese
  • 1 tablespoons minced fresh basil or 1 teaspoons dried basil
Directions
  • Cook tortellini according to package directions.
  •  
  • Meanwhile, in a large skillet, saute mushrooms and onion in butter
  • until tender. Add garlic; cook 1 minute longer. Stir in broth. Bring
  • to a boil. Reduce heat; simmer, uncovered, for 12-15 minutes or
  • until liquid is reduced by half.
  •  
  • Add the cream, salt and pepper. Cook 4-5 minutes longer or until
  • slightly thickened. Drain tortellini; add to skillet. Stir in cheese
  • and basil. Yield: 4 servings.

Friday, March 28, 2014

Vanilla bean Custard

This is a fabulous recipe, although it wasn't so fabulous for what I used it for.  I decided to make a crepe cake for Carrie's b-day.  The crepes turned out lovely and this creamy deliciousness turned out perfectly.  The blog I got it from used it to make a crepe cake.  Well, my crepe cake didn't turn out like hers.  At all.  I could tell it was getting a little slippery, and I even used less filling between each layer than she called for.  I was really annoyed at first and I swore off crepe cakes forever.  But by dessert time I was able to laugh about it - it sort of reminded me of the cake that the fairies make in Sleeping Beauty - I was just waiting for the candles to slide down the side.  We called it "cake pile".  As you can see.  So the combination was delightful but I would use something else if you're making a crepe cake.  Or, just be like me - don't make a crepe cake.  : )  We decided that this would be better if we just used it to drizzle on top of crepes with some fresh berries.  Mmmmmmmm......


Vanilla Bean Custard (or pastry cream)
  • 2 cups half and half
  • 1/2 cup sugar, plus 2 Tablespoons sugar
  • ⅛ teaspoon salt
  • 5 egg yolks
  • 3 Tablespoons cornstarch
  • 4 Tablespoons butter cut into cubes
  • 1 vanilla bean or 2 teaspoons vanilla extract

INSTRUCTIONS
  1. Pour the half and half into a small/medium saucepan. It’s important to uses a saucepan with a solid bottom, or your custard will burn easily. If you don’t have a good quality saucepan, use a pot with a nonstick finish.
  2. Add the 1/2 cup of sugar and salt. 
  3. If you’re using a vanilla bean, split it in half with a knife and scrape out the seeds. Add the seeds to the half and half. (Don’t forget to use up the scraped out vanilla bean by making Vanilla Sugar, which, if you have some on hand, you can use in this recipe instead of regular sugar. It will taste phenomenal.) If you’re using vanilla extract, don’t pour it in yet.
  4. Bring the mixture to a simmer on medium low heat, just until the sugar dissolves and you see tiny bubbles begin to appear on the surface of the half and half.
  5. Meanwhile, whisk the egg yolks with the remaining 2 Tablespoons of sugar in a large bowl, until the sugar dissolves.
  6. Add the cornstarch and keep whisking until it’s completely incorporated into the egg yolks.
  7. As soon as the half and half comes to a simmer, ladle in a small amount of the hot liquid into the egg yolk mixture, whisking it all together at the same time, to make sure your eggs don’t scramble. Gradually add 2 to 3 more small ladles of the half and half to the eggs, and then pour the egg mixture into the pan with the remaining half and half mixture, whisking as you add it in.
  8. Return it to the stove and cook on low heat, whisking constantly, until the custard thickens. You can make sure it’s thick enough by dipping a wooden spoon into the custard and when you run your finger down the center, the line should remain there and not run together. Another sign to look for is that as soon as the custard thickens, you will see bubbles start to rise from the very bottom of the saucepan and burst at the top. Remove the pan from the heat.
  9. At this point, check the consistency of your custard. If there are any lumps, tiny or big, it’s very easy to fix this. Pour the custard through a fine mesh sieve and you’ll have beautiful, smooth cream.
  10. While it’s still hot, add the butter and mix it all together until the butter melts.
  11. If you’re using vanilla extract, add it to the pastry cream now.  Cool the pastry cream before using it.
  12. To prevent a skin from forming on the very top of the pastry cream, place a piece of plastic wrap or a bit or parchment paper directly on the surface of the pastry cream.
  13. You can make the pastry cream/custard DAYS in advance, which is such a huge plus. Keep it refrigerated and tightly covered.

Recipe from http://www.olgasflavorfactory.com/


Eggnog-Cinnamon Scones

I know that these sound a little odd, but trust me - they are so stinkin' good.  I haven't actually made them yet.  Some friends brought some to us this winter and I finally remembered to ask her for the recipe.
I could eat the whole recipe myself but I guess I'll share when I make them.  : )

Eggnog-Cinnamon Scones

2 3/4 C. flour
1/4 C. sugar
3/4 t. salt
1 T. baking powder
1/2 t. ground nutmeg
1/2 C. unsalted butter, cut into small cubes and well chilled
6.6 oz. cinnamon chips (2/3 of a Hershey's bag)
1 egg
1/2 t. vanilla extract
1/4 t. rum extract
1 C. cold eggnog
Turbinado sugar

1. In a large mixing bowl, whisk together dry ingredients.  With a wide whisk, work in the butter just until the mixture is unevenly crumbly.  Stir in the cinnamon chips.
2. In a separate bowl, whisk together the egg, vanilla, rum extract, and eggnog.
3. Add the egg mixture to the dry mixture and stir until all is moistened and holds together.
4. Transfer the dough to a lightly floured work surface (or use a silicone mat).  Divide the dough in half.  Roll and pat each half into a 6 1/2" circle about 3/4" think.
5. Run a large knife under cold water and slice each circle into 6 or 8 wedges.  Transfer wedges to a cookie sheet lined with parchment paper.  Carefully separate the wedges just a little bit (about 1/2")
6. Brush each scone with some eggnog and sprinkle generously with turbinado sugar.
7. Preheat the oven to 425°.  Bake scones for 15-18 minutes or until golden brown.  Each scone should look baked all the way through - no wet edges.
8. While the scones are baking, prepare the glaze:

4 T. butter
3/4 c. powdered sugar
Eggnog, to thin the mixture

1. Heat butter in a small saucepan until it melts, then continue cooking until the butter browns.  Remove from heat, and whisk in powdered sugar until mixture is thick.
2. Add eggnog, a little bit at a time, until mixture is smooth and spreadable.
3. Remove scones from the oven and cool briefly on the pan.
4. Glaze scones.  Use a fork to drizzle the glaze across the top of each scone.
5. Serve warm.  Let leftovers cool completely, then cover with plastic wrap and store at room temperature.

(They're still delectable even when they're not warm.)

Wednesday, March 26, 2014

Strawberry Spinach Salad


We made this salad last night - so easy and a perfect taste of spring! The original recipe calls for blue cheese but not everyone in my house likes that so I used feta and it was great.


Strawberry Spinach Salad
 
Dressing
¼ C white vinegar
½ C vegetable oil
1/3 C white sugar
½ Tbsp poppy seeds
1/8 tsp onion powder
½ tsp Worcestershire sauce
¼ tsp paprika

Salad
1 bag baby spinach
1 C sliced or quartered strawberries
1 (4oz) package crumbled feta cheese or blue cheese
½ C pecan halves

Whisk dressing ingredients together in small bowl until sugar is completely dissolved. 

Layer spinach, strawberries, cheese and pecans on serving plates.  Drizzle with dressing.  Enjoy!


**This makes plenty of dressing – store in refrigerator until needed again.


Altered slightly from a recipe on allrecipes.com.

Monday, March 17, 2014

Irish Apple Cake

I made this tasty treat for dessert tonight, since it's St. Patrick's day and all.
I have to say, the custard sauce didn't turn out very well for me, and Jeff didn't love it (the sauce) but the cake is good.  I liked it with the sauce but I admit it wasn't the best custard sauce ever...if you have a tried and true recipe for a good custard sauce, by all means, use it.  This is a really rustic cake with big chunks of apples and I loved the clove and nutmeg in the dough.  I wasn't sure how mine would turn out, because once I mixed it all together it didn't seem like there was much dough but it turned out great.

Irish Apple Cake


Ingredients
  • FOR THE CAKE:
  • 3 C. Flour
  • 2 t. Baking Powder
  • 1/8 t. Salt
  • 1/4 t. Cloves, ground
  • 1/4 t. Nutmeg, ground
  • 6 oz. Butter, (cold is fine)
  • 3/4 C. Sugar
  • 4 large Granny Smith apples(I used golden delicious to great effect)
  • 2 Eggs
  • 3/4 C. Milk
  • 2 T. Sugar(for sprinkling on top of cake)
  • FOR THE CUSTARD:
  • 6 large Egg Yolks
  • 6 T. Sugar
  • 1 1/2 C. Whole Milk
  • 1 1/2 t. Vanilla

Instructions
  1. FOR THE CAKE:
  2. Grease and flour an 8" or 9" round springform pan. Using an 8" pan will give you a taller cake.
  3. Preheat the oven to 375 degrees.
  4. Sift the flour, baking powder, salt, cloves and nutmeg into a large mixing bowl. Make sure the bowl is very large to allow room for the apples to be folded in.
  5. Cut the butter into the flour using your fingers or a pastry cutter until the mixture resembles fine crumbs.
  6. Add the 3/4 C. sugar to the flour mixture and mix in.
  7. Peel the apples and slice them into uniform pieces. This cake works best and gets that 'chunky apple look' if the slices are about 1/4" wide and then cut into 3 pieces.
  8. Toss the apples into the flour mixture and combine them thoroughly.
  9. In a separate bowl, beat the eggs and milk together. Add to the apples and flour and mix in with a large spatula until just combined. Batter will be thick and dough-like.
  10. Transfer the dough into the prepared cake pan and flatten the top surface using the back of your spatula.
  11. Sprinkle the sugar over the top of the cake.
  12. Bake for 45-50 minutes. Test the center for doneness. The top of the cake should be golden brown. Serve slices with custard sauce.
  13. FOR THE CUSTARD SAUCE:
  14. Place the egg yolks and sugar in a bowl and whisk until pale yellow, 2-3 minutes. Place the milk in a medium saucepan and bring just to a boil. Slowly whisk the hot milk into the egg/sugar mixture. Transfer the mixture back to the saucepan and stir over medium heat until custard thickens, about 4 minutes. Custard should be thick enough to coat the back of a spoon. Mix in the vanilla. Transfer to bowl or serving saucer.
  15. Serve warm or cold over apple cake.

I used the instructions from http://thekitchenmccabe.com because they were more clear-cut and to the point, but the recipe is originally from http://www.irishamericanmom.com/2013/03/01/kerry-or-irish-apple-cake/.  I think you should check out the irishamericanmom.com site if you're interested in reading about the origins of the recipe.  I like learning about the food from other countries.  And I also like eating food from other countries.  : ) 

Sunday, March 9, 2014

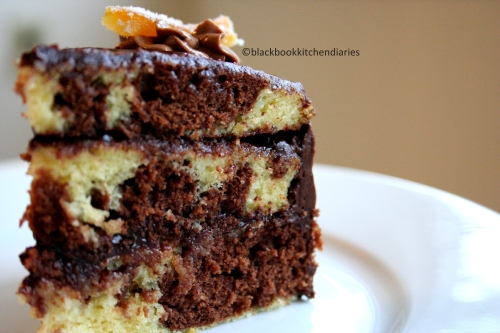
Chocolate Orange Marble Cake

You know the chocolate oranges or those chocolate orange sticks you can get at Christmas time? This is those in cake form. It is SO good! Like eat-it-slowly-and-savor-each-bite good.

Cameron wanted a marble cake for his birthday and when I Googled recipes I was surprised to find that many of them were from international sites. Who knew that marble cakes were an international thing? Others were baked as a loaf. Not what I was looking for. So I was glad when I found this and it sounded delicious. And it was!
Image from Blackbookkitchendiaries

Chocolate Orange Marble Cake
1 c. butter, softened
1 c. white sugar
3 eggs
1 tsp. vanilla
3/4 c. vanilla yogurt
3 T. orange zest (one large orange)
3 T. orange juice
1 3/4 c. all purpose flour
3/4 tsp. baking soda
3/4 tsp. baking powder
1/4 tsp. salt
2 oz. unsweetened or semi-sweet chocolate, melted

Preheat oven to 350. Grease and flour two round cake pans.

In a mixing bowl, cream together the butter and sugar until fluffy. Add the eggs, one at a time, beating after each addition. Add the vanilla, yogurt, orange zest and juice; mix well.

Sift the dry ingredients together and stir into the wet mixture just until combined. Scoop half of the batter into another bowl. Mix the melted chocolate into one of the bowls of batter. Spoon some of each batter into the cake pans. The batter is thick, so just put scoops of each flavor all around the pans. Using a knife, swirl the two batters together and make sure it is spread to cover the bottom of the pan.

Bake for 25-30 minutes.

We frosted ours with chocolate buttercream, but the site where I got it suggested ganache, which would make it super rich but really yummy too, I'm sure!

Adapted slightly from  Blackbookkitchendiaries.wordpress.com