I wasn't sure if the whole wheat flour would be too heavy in this recipe but it was just great. We all really liked this recipe.
Honey Lime Tilapia
For fish and marinade:
4 Tilapia fillets
2 Tbsp. lime juice (from 1 large lime)
zest of 1 lime
1 Tbsp olive oil
1 1/2 Tbsp honey
1/2 tsp salt
1/2 tsp black pepper
1 clove garlic, finely minced
For Coating:
1/2 C. whole wheat flour
1/4 tsp. salt
1/4 tsp. black pepper
1-2 Tbsp olive oil
In a small bowl, whisk together the lime juice, zest, olive oil, honey, salt, pepper and garlic. Place the tilapia in a gallon-sized ziploc bag and pour the marinade on top of the fish. Press the air out of the bag and seal. Refrigerate the fish for at least an hour and up to 4 hours. It helps to lay the bag in a flat dish and turn it over once or twice during the marinading time since the marinade won't completely cover the fish.
Whisk together the flour, salt and pepper in a shallow dish. Heat the olive oil in a large nonstick skillet over medium heat until rippling ad hot. Dredge each tilapia fillet in the flour, coating both sides lightly. Cook the fillets for 3-5 minutes per side without moving the fish while it cooks on each side; this will ensure a more even browning. Adjust the cooking time as needed dpeending on the thickness of the tilapia and the heat of the skillet and work in batches if necessary so the skillet isn't overcrowded. *
*Alternative cooking method...I drizzled the olive oil in a 9x13 pan and baked the fish at 350° until it flaked easily with a fork. It was very moist and flavorful.
Serve immediately.
Recipe originally from melskitchencafe.com
Sunday, August 19, 2018

Wednesday, August 15, 2018
Melt In Your Mouth BBQ Ribs
Mmmmm....these are tasty and easy to make. Everyone loved them!
Recipe origingally from http://www.geniuskitchen.com/recipe/beths-melt-in-your-mouth-barbecue-ribs-oven-107786?photo=373996
Melt In
Your Mouth Barbecue Ribs
Total time: 3 hours 15 mintues
Serves 6
Ingredients:
4 lbs. pork ribs
¾ C. light brown sugar
1 tsp. hickory smoke salt**
1 Tbsp. paprika
1 Tbsp. garlic powder
½ tsp ground red pepper (optional)
2 C. of your favorite BBQ sauce
Preheat oven to 300°.
Peel off the tough membrane that covers the bony side of the ribs. Mix together the sugar and spices to make the
rub. Apply the rub to ribs on all
sides. Lay the ribs on two layers of
foil, shiny side out and meaty side down.
Lay two layers of foil on top of ribs and roll and crimp edges tightly,
edges facing up to seal. Place on baking
sheet and bake for 2-2 ½ hours or until meat is starting to shrink away from
the ends of the bone. Remove from
oven. Heat the broiler or the
grill. Brush the BBQ sauce onto one side
of the ribs. Broil or grill until sauce
is cooked and bubbly, turn ribs over and repeat on the other side. Cut the ribs into serving sizes and
enjoy!
**If you can’t find hickory smoke salt just brush the ribs
with liquid smoke and/or use smoked paprika in the rub.
Wednesday, July 18, 2018
Dilly Beans
These are spicy pickled beans. A fun way to use some of your beans from the garden.
Dilly Beans
Yield: about 4 pints or 2 quarts
2 pounds green beans
1/4 c. canning salt
2 1/2 c. vinegar
2 1/2 c. water
1 tsp. cayenne pepper, divided
4 cloves garlic
4 heads dill
Trim ends off green beans. Combine salt, vinegar, and water in a large saucepan. Bring to a boil. Pack beans lengthwise into hot jars, leaving 1/4-inch headspace. Add 1/4 tsp. cayenne pepper, 1 clove garlic, and 1 head dill to each pint jar. (Double the amounts for each jar if using quart size.) Ladel hot liquid over beans, leaving 1/4-inch headspace. Remove air bubbles. Adjust 2-piece caps. Process in a boiling water canner for 10 minutes. (Adding time for higher elevation. Where I live is about 4,000 some feet so I add 10 minutes, for a total of 20 minutes. Here's a handy dandy chart to reference.)
Turn burner off and remove canner lid. Let jars rest in water for 5 minutes, remove and cool.
From the Ball Blue Book of Preserving
Dilly Beans
Yield: about 4 pints or 2 quarts
2 pounds green beans
1/4 c. canning salt
2 1/2 c. vinegar
2 1/2 c. water
1 tsp. cayenne pepper, divided
4 cloves garlic
4 heads dill
Trim ends off green beans. Combine salt, vinegar, and water in a large saucepan. Bring to a boil. Pack beans lengthwise into hot jars, leaving 1/4-inch headspace. Add 1/4 tsp. cayenne pepper, 1 clove garlic, and 1 head dill to each pint jar. (Double the amounts for each jar if using quart size.) Ladel hot liquid over beans, leaving 1/4-inch headspace. Remove air bubbles. Adjust 2-piece caps. Process in a boiling water canner for 10 minutes. (Adding time for higher elevation. Where I live is about 4,000 some feet so I add 10 minutes, for a total of 20 minutes. Here's a handy dandy chart to reference.)
Turn burner off and remove canner lid. Let jars rest in water for 5 minutes, remove and cool.
From the Ball Blue Book of Preserving
Saturday, June 9, 2018
Italian Easter Bread
Italian Easter Bread
I've wanted to make this for years because it just looks so fun and this year I finally did. It's a slightly sweet bread and really adds to the color of the Easter table. In my opinion you *must* use colored sprinkles and I had some pastel ones that fit perfectly for the season. Lots of fun!You don't want to refrigerate this bread since refrigeration dries bread out so if you bake these just in time to serve them you can eat the eggs, otherwise just throw the eggs away once you start eating the bread. If you don't have a silpat, parchment paper is your best friend (as usual!). Here's my bread:

Italian Easter Bread
Ingredients
- 1 package (2 1/4 teaspoons) instant yeast
- 1 1/4 cups warm milk
- Pinch of salt
- 1/3 cup butter , at room temperature
- 2 eggs , lightly beaten
- 1/2 cup sugar
- 3 1/2 to 4 1/2 cups flour
- egg wash (1 egg, beaten with 1 teaspoon of water)
- 6 dyed , uncooked, Easter eggs (will cook in the oven)
- Sprinkles
Instructions
- Mix together the yeast, milk, salt, butter, eggs and sugar in a large mixing bowl. Add 2 cups of flour and beat until smooth, with the paddle attachment. With the mixer on low speed, continue to slowly add the rest of the flour just until a dough forms. Switch to the dough hook attachment and knead on low speed until the dough is smooth and elastic. Add more flour as needed so that it is tacky, not sticky. Alternatively, the dough can be kneaded on a floured work surface, by hand. Transfer to an oiled bowl, turning once to coat both sides. Cover tightly with plastic wrap and let rise in a warm, draft-free place until doubled, about 1 hour.
- Line a large baking sheet with parchment paper or a silicone liner. Punch down the dough and divide into 12 equal pieces (about 3.5 oz each). Roll each piece into a 14-inch rope.
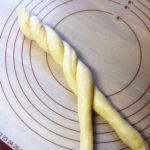
- Twist two ropes to form a "braid", then join the ends to loop into a circle while pinching the tips together. Place on the prepared baking sheet.
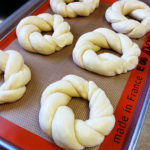
- Repeat with remaining dough ropes. Cover with a clean towel and let rise again until nearly doubled, about 1 more hour.
- Preheat the oven to 350 degrees F. Brush the tops of the dough "nests" with the egg wash. Decorate with the sprinkles.
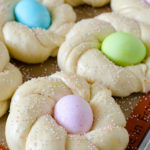
- Place one egg in the center of each nest, pressing down lightly to secure. Bake in the preheated oven for 20 to 25 minutes, until golden brown. Cool on a wire rack. Serve warm or at room temperature.
- Recipe Note: The eggs can be eaten by cracking and dipping the bread in them, however, I would recommend discarding them if not consumed within a few hours.
- Source: Adapted from The Italian Dish
Images and recipe from: Seededatthetable.com
Monday, May 14, 2018
Raspberry Sweet Rolls
Jeremy made these for me for Mother's Day and we all agreed that they were so yummy. The dough is very light and fluffy and the flavor is fabulous.
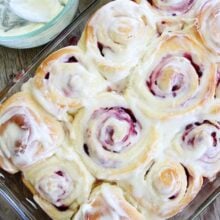
RASPBERRY SWEET ROLLS
These raspberry sweet rolls with cream cheese frosting are the perfect treat for breakfast or brunch!
yield: MAKES 24-30 ROLLS
cook time: 17 MINUTES
INGREDIENTS:
FOR THE DOUGH:
- 2 packages yeast (4 1/2 teaspoons), dissolved in 1 cup lukewarm water
- 6 tablespoons shortening (Crisco)
- 1 cup granulated sugar
- 9 cups unbleached all-purpose flour
- 2 cups hot water
- 2 eggs, beaten
- 1 tablespoon salt
FOR THE FILLING:
- 1/2 cup softened butter
- 1/2 cup light brown sugar
- 3 1/2 cups frozen raspberries
- 1/3 cup granulated sugar
- Zest of 1 large lemon
- 1 1/2 teaspoons cornstarch
For the frosting:
- 8 ounces cream cheese, at room temperature
- 1/2 cup unsalted butter, at room temperature
- 2 cup powdered sugar
- 2 teaspoon lemon zest
DIRECTIONS:
- Add yeast to 1 cup of lukewarm water. Stir with a spoon and set aside for about five minutes.
- In the bowl of a stand mixer, add shortening, sugar, and salt to hot water and beat for 30 seconds. Let cool to lukewarm temperature. Stir in 2 cups of flour and mix until smooth. Add yeast mixture and mix until well combined. Mix in the beaten eggs.
- Gradually stir in the remaining flour and mix with the dough hook for about 2 minutes. Remove dough from the bowl and place on a lightly floured counter. Knead by hand, add a little flour if the dough is still sticky. Knead until dough feels satiny and smooth.
- Put the dough in a greased bowl and cover with a towel. Let rise for 30 minutes or until dough doubles in size.
- Remove dough from bowl and place on a lightly floured counter. Divide dough in half. With a rolling pin, roll one half of the dough into a rectangular shape. Spread dough evenly with 4 tablespoons of softened butter. Sprinkle dough with 1/4 cup brown sugar. In a medium bowl, carefully stir together the frozen raspberries, granulated sugar, lemon zest, and cornstarch. Sprinkle half of the raspberry mixture over the dough.
- Gently roll up dough into one long roll. Cut rolls, using a piece of dental floss or thread, about two inches thick. Place rolls into a greased 9X13 baking pan.
- Now follow the exact same steps with the other half of the dough, using the remaining ingredients.
- Place rolls in a warm spot and cover with a towel. Let rolls rise until double in bulk, about an hour. Bake rolls at 350 degrees F for 25-32 minutes or until golden brown on top. The insides should be soft, but not doughy. Remove pans from oven and let cool on a wire rack.
- While the rolls are cooling, make the frosting. In a medium bowl, combine cream cheese, butter, powdered sugar, and lemon zest. Using electric mixer, beat until smooth. Spread frosting on rolls and serve.
All images and text ©.
Monday, May 7, 2018
CHEESY FLORENTINE PASTA
Another yummy pasta recipe. I didn't used to love pasta with spinach in it, but I realized that's because everyone leaves the spinach in huge leaves and then you get a huge bite of soggy spinach. I started using my kitchen shears to sliced it, a handful at a time, into really thin pieces and that has made all the difference.
CHEESY
FLORENTINE PASTA
PREP:15
MINUTES
COOK:15
MINUTES
TOTAL TIME:30
MINUTES
INGREDIENTS:
·
1 pound penne pasta
·
3 tablespoons unsalted butter
·
3 tablespoons flour
·
2 cups whole milk
·
1/2 teaspoon kosher salt
·
1/4 teaspoon coarse ground black
pepper
·
1 cup mozzarella cheese
·
1/2 cup Parmesan cheese
·
4 cups fresh baby spinach, thinly
sliced
·
1/4 cup roasted peppers,
diced
DIRECTIONS:
1.
Cook the pasta one minute shy of the
directions listed on the box and drain (do not rinse).
2.
Add the butter to the pot you just
used for the pasta (make sure to have at least rinsed it out well).
3.
Once melted add in the flour and
whisk well, cooking for about a minute.
4.
Add in the milk slowly while
whisking until smooth.
5.
Add in the salt, pepper, mozzarella
and Parmesan cheese and whisk well.
6.
Add the pasta back in and toss well.
7.
Add in the spinach and bell peppers
and toss a bit more before serving.
All images and text © for
Dinner, then Dessert, Inc.
Recipe Permalink: https://dinnerthendessert.com/cheesy-florentine-pasta/
Caramelized Frozen Green Beans with Mushrooms
I am trying to clean out our freezer before the move and I realized that I have a whole lot of frozen green beans that I never use. I always defer to broccoli, cauliflower, brussels sprouts and asparagus. I'm glad I tried this recipe for green beans because Jeremy and I both loved it. None of my kids would eat them, but you can't win 'em all.
https://lynnecurry.com/2012/02/best-frozen-green-beans/
Caramelized Frozen Green
Beans with Mushrooms
This recipe is
originally from cookbook author Anne Willan who calls them "burnt
beans." It deals with the problem of mushy green beans, which is what
happens when you cook any frozen green bean--even those you've picked, blanched
and frozen straight from your garden. But in this recipe, the beans slow cook
until crispy. Don't fret the butter.
Course Side
Dish
Cuisine American
Prep Time 5 minutes
Cook Time 45 minutes
Total Time 50 minutes
Ingredients
·
6 tablespoons unsalted
butter
·
1 pound frozen
green beans
·
1/2 teaspoon salt
·
1/8 teaspoon black
pepper
·
1 medium shallot,
diced
·
1 package mushrooms,
sliced
Instructions
1.
Heat a large cast-iron
pan or skillet over medium-high heat and add the butter.
2.
When the butter foams,
add the green beans, stir to coat them in the butter and leave them to heat
until they're no longer frost coated, about 5 minutes.
3.
Add the salt and pepper.
Reduce the heat to medium-low so that you can still hear them sizzling and stir
the beans intermittently until they shrink, wrinkle and about half of them are
darkly colored, about 30 minutes more.
4.
Add the shallots and
mushrooms for the last 10 to 15 minutes of cooking until the mushrooms brown
and the shallots soften (you may need to turn up the heat for this in order to
keep caramelizing, as the mushrooms will introduce more liquid, but watch it an
turn it back down if it gets too hot).
5.
Taste for seasoning
before serving.
https://lynnecurry.com/2012/02/best-frozen-green-beans/
Subscribe to:
Posts (Atom)